> For the complete documentation index, see [llms.txt](https://docs.world3.ai/world3/llms.txt). Markdown versions of documentation pages are available by appending `.md` to page URLs; this page is available as [Markdown](https://docs.world3.ai/world3/how-to-guides/routerlink/tutorials/how-to-integrate-routerlink-in-opencode.md).
# How to integrate RouterLink in OpenCode
{% hint style="info" %}
This documentation is provided for informational purposes only and demonstrates how to configure and use our API with third-party AI chat interfaces. Any third-party software, websites, or services mentioned are not operated, controlled, or endorsed by us.
{% endhint %}
## Overview
This tutorial guides you through integrating **RouterLink**—WORLD3's decentralized AI model routing infrastructure—with **OpenCode**, a personal AI assistant you run on your own devices.
### Purpose
RouterLink provides a unified API endpoint that routes requests to multiple AI model providers through a decentralized network. By integrating RouterLink with OpenCode, you gain access to a diverse range of large language models (LLMs) without managing multiple API keys or provider-specific configurations.
### What You Will Learn
By completing this tutorial, you will:
* **Configure OpenCode** to connect with RouterLink's API endpoint
* **Authenticate** using your RouterLink API credentials with custom headers
* **Add and manage AI models** available through the RouterLink network
* **Execute inference requests** through OpenCode's conversational interface
### Prerequisites
Before proceeding, ensure you have:
* A RouterLink API key (obtain one from the [Quick Start Guide](https://docs.world3.ai/world3/how-to-guides/routerlink/quick-start-guide))
* A web browser with internet access
* Basic familiarity with API configuration concepts
## Introduction to OpenCode
[OpenCode](https://opencode.ai/) is an open source AI coding agent. It’s available as a terminal-based interface, desktop app, or IDE extension.**OpenCode** Key Features:
* Local-first, privacy-focused
* Supports 75+ AI models
* Terminal-based interactive UI
* Code generation, debugging & refactoring
* Plugin & tool integrations (MCP)
* Agent modes for coding & planning
* Multi-session support
* LSP-powered code intelligence
* Highly customizable & extensible
* Automation with shell & file operations
### Step 1: Install OpenCode
Install [the newest LTS version of Node.js](https://nodejs.org/en/download/)After installation is complete, open the terminal (Windows users use PowerShell) and check the version number.
* macOS, Linux, Windows:
```bash
npm install -g opencode-ai
```
### Step 2: OpenCode CLI credential registration
Before modifying the configuration file, you need to register a provider alias (Provider ID) in the local key manager. This step ensures the secure hosting of the API Key, preventing it from being hardcoded in plain text within the configuration file.Execute the authentication command:
```bash
opencode auth login
```
Select the type: Locate and select "other" at the bottom of the list (you can directly type to search).
\
Define the ID: Enter "local".
\
Enter the key: Input the token key API Key (sk-xxxx) that you have created on [Quick Start Guide](https://docs.world3.ai/world3/how-to-guides/routerlink/quick-start-guide).
### Step 3: Configure OpenCode
OpenCode uses the `opencode.json` file to parse provider parameters. Please locate and create/edit this file according to your operating system.
Edit or create `opencode.json` file
On macOS & Linux: \~/.config/opencode/opencode.json
On Windows: C:\Users\\\\\.config\opencode\opencode.json
Configuration file:
```json
{
"$schema": "https://opencode.ai/config.json",
"provider": {
"local": {
"npm": "@ai-sdk/openai-compatible",
"name": "local",
"options": {
"baseURL": "https://router-link.world3.ai/api/v1"
},
"models": {
"world3-router-north-america/openai/gpt-5.3-codex": {
"name": "gpt-5.3-codex"
},
"world3-router-north-america/google/gemini-3.1-pro-preview": {
"name": "gemini-3.1-pro-preview"
},
"world3-router-north-america/anthropic/claude-opus-4.7": {
"name": "claude-opus-4.7"
}
}
}
}
}
```
npm: Use `@ai-sdk/openai-compatible` to adapt to the OpenAI-compatible protocol.
baseURL: Enter the API endpoint of the RouterLink platform.
models: You need to manually declare the list of models supported by the RouterLink platform. The keys must correspond to the actual Model IDs.
### Step 4: OpenCode Loading and Validation
Launch the main program:
```bash
opencode
```
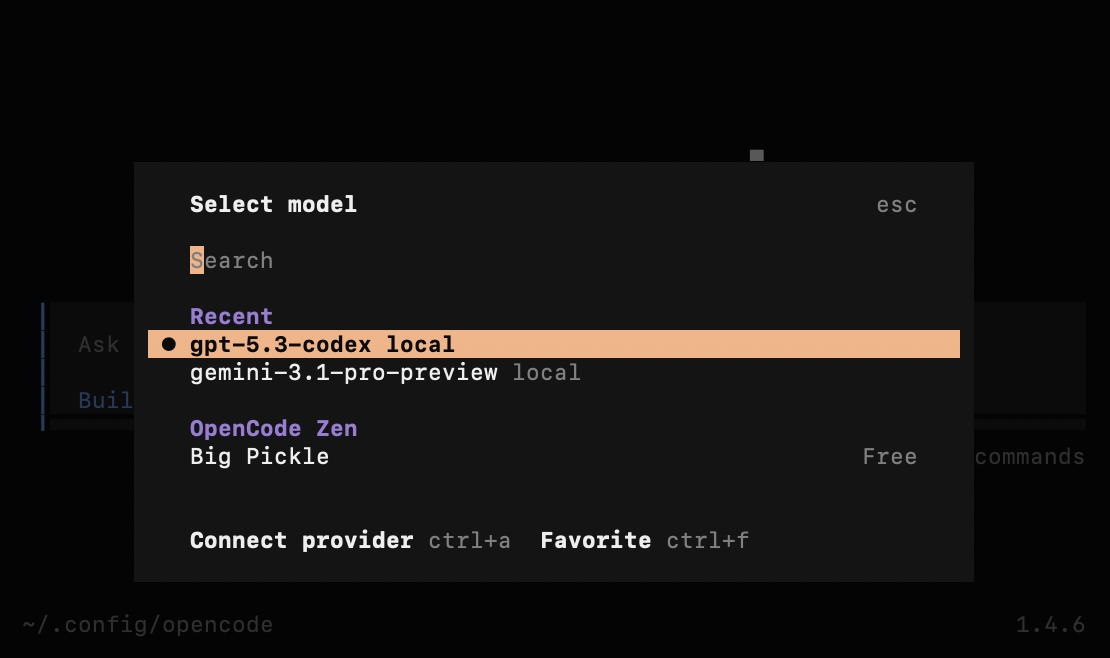
Enter the following command in the interactive prompt to open the model menu: `/models`
If the configuration is correct, you will see the custom n1n platform and its models listed.